The Chrysler Minivan Fan Club Forums banner

Leaking Front Crankshaft Seal

24K views 23 replies 7 participants last post by  1994 Sport  
#1 ·
Hi All, I noticed a very small leak today coming from the front crankshaft seal, after changing the oil on our 01 DGC EX 3.8L engine. Any body know how to replace this seal? What special tools needed for the job? How hard is it and step by step how to do repair?

Thanks
 
#2 ·
You will need a pulley/balancer removal tool.
This is what mine looks like.

A standard 3 jaw puller will work in a pinch. If you try to use the standard puller over and over it get worn out fast since the press fit is fairly tight. You should be able to rent one.

Remove the splash shield and belt, pull the pulley.
Once the pulley is off the seal can be pulled out with a pick or by threading a drywall screw into it. You can press the new one in with your fingers.
 
#6 ·
You will need a pulley/balancer removal tool.
This is what mine looks like.
View attachment 22458
A standard 3 jaw puller will work in a pinch. If you try to use the standard puller over and over it get worn out fast since the press fit is fairly tight. You should be able to rent one.

Remove the splash shield and belt, pull the pulley.
Once the pulley is off the seal can be pulled out with a pick or by threading a drywall screw into it. You can press the new one in with your fingers.
Thanks, sounds simple enough. I decided to change out the timing chain and gears too, since I hear a slight rattle by the crank pulley. We will be going on a 2000K trip next year and I don't want any surprises.
 
#3 ·
Before you get carried away try a liquid crankcase stop leak, cheap and easy and well worth a try.

I always go this route before I do any serious work!
 
#7 ·
I've used it for 50 years including in my RV PS system with never a problem.

Unlike cooling system leak stoppers it is a solvent that swells seals, if anything it makes oil thinner. It does not plug holes.
Never,ever use StopLeak,it will plug tiny oil passages in the engine,you will end-up with more problems.
Thanks but I don't use any types of stop leak. (Have done so in the past with negative results.) I prefer to fix the problem if I can and not put a band-aid on it.
 
#5 ·
I've used it for 50 years including in my RV PS system with never a problem.

Unlike cooling system leak stoppers it is a solvent that swells seals, if anything it makes oil thinner. It does not plug holes.
 
  • Like
Reactions: 1994 Sport
#9 ·
Your call, but oil stop leaks are not any way harmful and sometimes they work.

I've had both poor and good results, but it is a cheap and easy first effort.

It will not, repeat, will not plug any holes anywhere - it is much thinner than the oil.
 
  • Like
Reactions: 1994 Sport
#10 ·
If the oil is not leaking on the ground...Why worry about the leak and trying to fix it?

I had my van up on the lift today to do some stuff and had a good look at the back of the engine to see that I have an oil seep of some sort. Didn't bother to waste time to find out where it's coming from as it's not dripping on the ground, I don't notice any oil smells, and because of that I probably lose 1/2 a quart of oil between changes.

Doesn't worry me and I can sleep at night. Not worth the time and aggravation to go after the seep. At $6 a quart of oil, i'd just leave the oil seep alone.
 
#13 ·
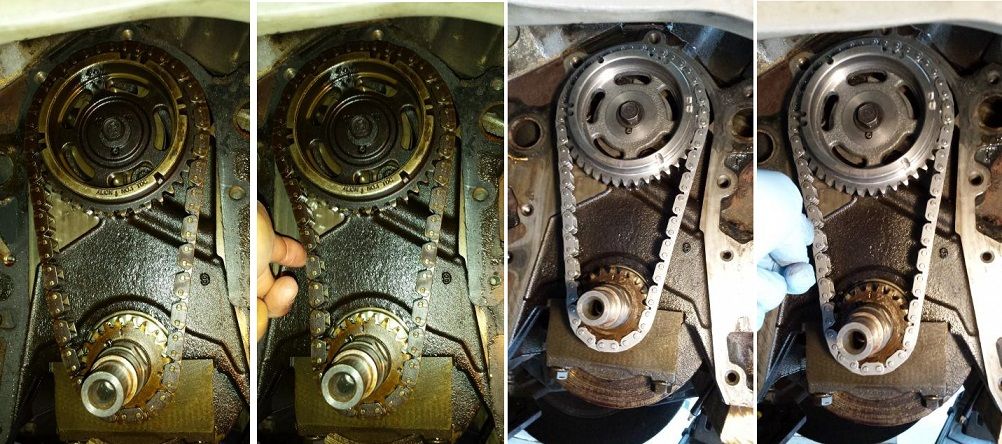
So I thought to update you guys on my progress. This past 2 weeks I’ve been working on replacing the timing chain, gear, camshaft sensor, crankshaft seal, oil pressure sensor and oil pan gasket. (16 hrs into this so far) I was doing a routine oil change and oil pan gasket replacement, when I noticed I could see the timing chain with the oil pan removed. Well I was able to reach up in the timing chain cover to see how stretched the chain was. (It was stretch) So I decided to replace it. Outside of it taking so long to remove everything to get to the timing chain, the only problem a rain into that I couldn’t solve was finding the removal/install tool for the crankshaft gear. (I searched the net with no luck finding the tool.) So, I decided to just reuse the old one, since it didn’t appear worn or damaged. I’m still putting stuff back together, so I don’t know if its sealed up well. (Which I believe it is.)

1) If you do attempt this job, having power tools will make it much easier.
2) I used some sharpie permanent bright color markers to label all the bolts on the timing chain cover and took a picture.
3) Get the removal/installer tool for the crankshaft gear before you get started.
 
#18 ·
Here is the puller I used to remove the lower gear.
 
  • Like
Reactions: itsallgood
#14 ·

Attachments

#16 ·
When I replaced the "O" rings in the timing chain cover of our 1998 DGC Sport I looked at the timing chain and decided the amount of stretch (similar to what is in the two left pictures above) wouldn't be worth fixing, so I buttoned it all back up and kept on driving. :)
 
#19 ·
Got everything back together. Filled her up with distilled water and oil. Started her up, no leaks and the engine is much quieter. (I'm replacing the radiator, that's why I didn't refill with coolant.) I used a pack of washers, the same size as the crankshaft bolt washer, to reinstall the harmonic balancer. Worked like a charm. Make sure to use a high temp and oil and water resistant gasket sealant for the timing chain cover. Apply a thin layer on the timing chain cover, let it dry for 20 min, then place the timing cover gasket on the timing chain cover. Apply a thin layer of gasket sealant to the exposed gasket and a thin layer on the timing chain case. let them dry for 20 min before putting it together. Once you have the timing cover installed, bolt it together and let dry for 12 to 24 hrs. before starting engine. (This will insure gasket adhesion.)
 
#24 ·